Email accounts
- Getting app password for AOL mail
- Getting app password for GMail/Gsuite
- Getting app password for Outlook and Hotmail
- Getting app password for Yahoo mail
- Enabling IMAP in AOL Mail
- Enabling IMAP in GMail/Gsuite
- Enabling IMAP in Yahoo Mail
- Enabling less-secure-apps setting in Gmail
- Adding another email address to Gmail
- How to access the Gmail archive
- How to forward Gmail emails to another Gmail
- How to recall an email in Gmail
- How to empty trash in Gmail
- Adding an email folder to Gmail
- Using email filters in Gmail
- Changing your Gmail background
- Marking emails as read in Gmail
- How to cc in Gmail emails
- How to add email to safe sender list Gmail
- 3 ways to attach an email in Gmail
- How to delete all unread emails in Gmail
- How to add an alias to Gmail
- How to add contacts to Gmail
- How to add a signature to Gmail
- How to change Gmail password
- How to blacklist Senders in Gmail
- How to change the name in Gmail
- How to change your Gmail address
- How to create a mailing list in Gmail
- How to delete a Gmail account
- How to encrypt an email in Gmail
- How to forward multiple emails in Gmail
- How to import contacts to Gmail
- Recovering deleted emails in Gmail
- How to select all emails in Gmail
- How to send a calendar invite in Gmail
- How to correctly sign out of Gmail
How to add an alias to Gmail
There are at least two ways to add an alias to Gmail. Let’s review both of them.
Gmail has a built-in alias mechanism that allows adding dots and pluses to the name of the box. Let's take a look at these features using examples: Let's say you're the owner of [email protected].
If we write letters to [email protected], [email protected] or even [email protected] - they will come to you correctly to the original email [email protected]. Gmail ignores dots in mailboxes. But there are several limitations:
- You cannot write several dots in a row ([email protected] - it's not a valid address).
- You cannot write dots at the beginning and end of a mailbox name ([email protected] / [email protected] - it’s not a valid address).
The "+" symbol can be added after the name of the box, adding any other name after it. For example, you can send an email to boxes [email protected], [email protected], and they will reach the original box.
Using both a dot and an email, you can't completely change your email address, but they are very convenient for filtering incoming emails. For example, to order a product on a website, you can leave an email to [email protected] and use the filter to mark incoming emails to this alias in a separate label or delete them. Unfortunately, not all registration forms allow you to enter a "+" in the email field. In this case, using a point (".") in the alias may help.
If you already have another email, we can add it as an alias to our Gmail.
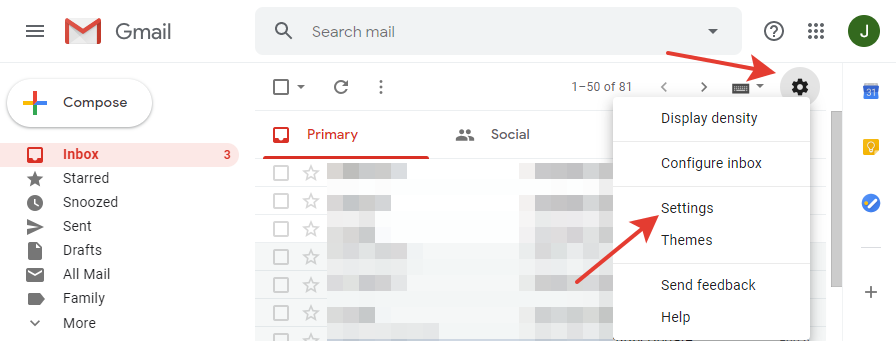
- Click the gear icon at the top right.
-
Click the
Settingsbutton.
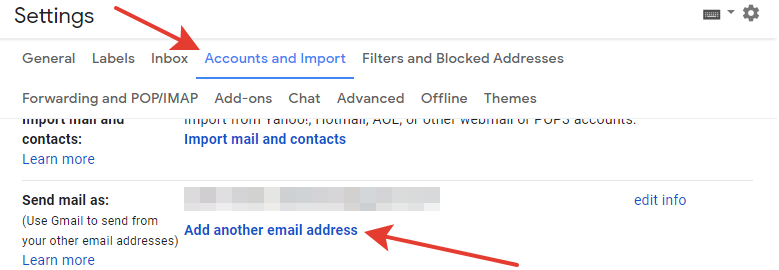
- Click the
Accounts and Importtab. -
In the
Send mail as:field, chooseAdd another email address.
-
In the new window, enter the name from which the email will be sent, as well as the email itself.
Make sure the
Treat as an aliascheckbox is checked.
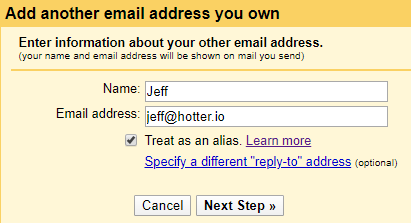
- Click the "Next Step" button.
-
In the next window, enter the email settings:
- SMTP Server - most likely, Gmail will be automatically detected. If this does not happen, you can check your SMTP server with the email provider of the connected email provider.
- Username - usually equals either the full email address or the name of the mailbox (the beginning of the email before the "@" symbol).
- Password - password from the mailbox.
- Port - by default 587 (for TLS) and 465 (for SSL).
- Type of connection (TLS or SSL).
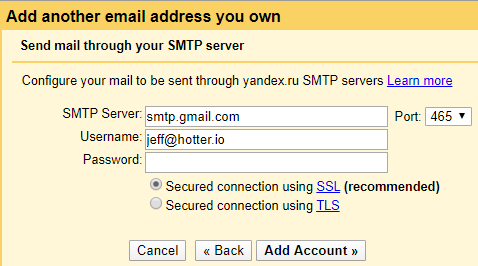
- Click the
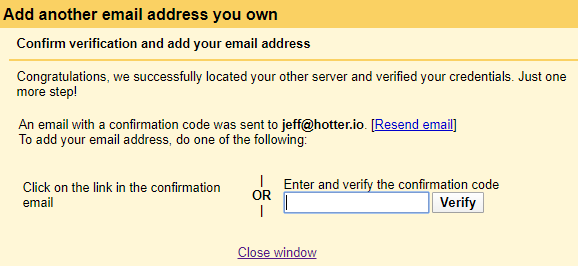
Add Accountbutton. - Open the connected account mailbox. It contains an email confirming that the account has been added to our Gmail. Open this email and get the verification code from it.
- Go to your Gmail account and paste the confirmation code into the code field.
-
Click the
Verifybutton.
-
The
When replying to a message:checkbox will appear on the settings page below theAdd another email addressbutton. With this checkbox you can specify from which email address to reply by default if you received an email to a connected mailbox:- Reply from the same address the message was sent to.
- Always reply from the default address.
We will now be receiving emails from a connected mailbox. When you create a new email, in the "To:" field, you can choose from which address to send it.
You can read about how to connect an alias to Gmail using G Suite in the official article: https://support.google.com/a/answer/33327?hl=en
Read more:
Have questions? Contact us: [email protected]
Terms of Service Privacy policy Email hints Contact us
Made with favorite in Cyprus