Email accounts
- Getting app password for AOL mail
- Getting app password for GMail/Gsuite
- Getting app password for Outlook and Hotmail
- Getting app password for Yahoo mail
- Enabling IMAP in AOL Mail
- Enabling IMAP in GMail/Gsuite
- Enabling IMAP in Yahoo Mail
- Enabling less-secure-apps setting in Gmail
- Adding another email address to Gmail
- How to access the Gmail archive
- How to forward Gmail emails to another Gmail
- How to recall an email in Gmail
- How to empty trash in Gmail
- Adding an email folder to Gmail
- Using email filters in Gmail
- Changing your Gmail background
- Marking emails as read in Gmail
- How to cc in Gmail emails
- How to add email to safe sender list Gmail
- 3 ways to attach an email in Gmail
- How to delete all unread emails in Gmail
- How to add an alias to Gmail
- How to add contacts to Gmail
- How to add a signature to Gmail
- How to change Gmail password
- How to blacklist Senders in Gmail
- How to change the name in Gmail
- How to change your Gmail address
- How to create a mailing list in Gmail
- How to delete a Gmail account
- How to encrypt an email in Gmail
- How to forward multiple emails in Gmail
- How to import contacts to Gmail
- Recovering deleted emails in Gmail
- How to select all emails in Gmail
- How to send a calendar invite in Gmail
- How to correctly sign out of Gmail
How to add a custom email server to Hotter
You can use any custom email servers to send emails with Hotter.
To manage your email accounts, go to the Settings → Email Accounts section.
Click Add an Email Account and select the Custom option.
Now, fill in the required fields (find the description of all fields below). When done, press the TEST button to check if our system
is able to connect to your server using the credentials your provided. If something went wrong, please recheck credentials or contact or the system administrator.
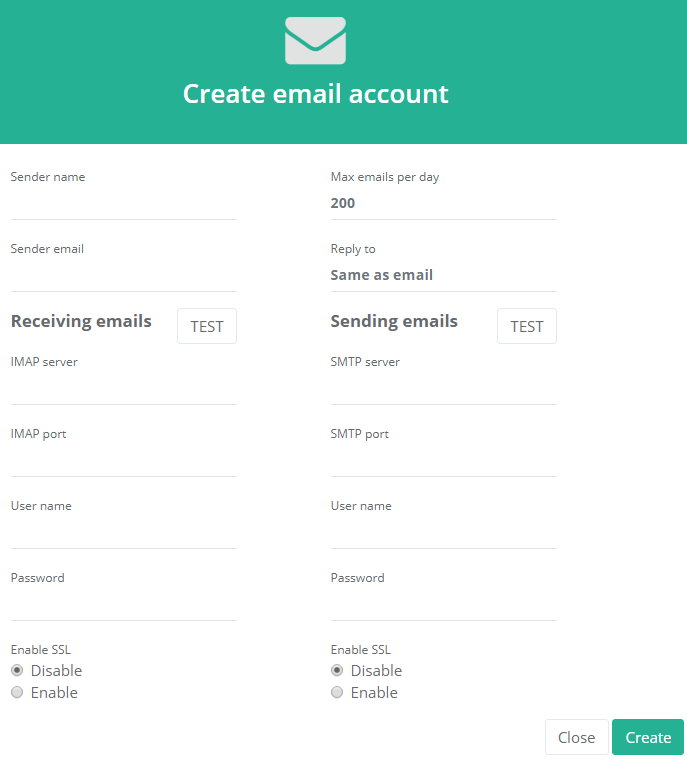
Hotter requires both reading and sending to your email account. We use sending functions to send your email campaigns and reading functions to automatically check the replies from leads as well as bounces, out-of-office replies and other lead activities.
Email — an email address on this mail server in standard format ([email protected])
Sender name — this name will be used in FROM fields in all future outgoing emails.
Receiving emails section (IMAP)
IMAP server — your remote IMAP web server IP or URl
IMAP port — your server IMAP port. Usually 143 for Non-Encrypted connections, 143 or 993 for SSL/TLS.
User name — your username (login) on IMAP server.
Password — your password on IMAP server.
Enable SSL — enable SSL technology (encrypted connection, if supported by your server).
Sending emails section (SMTP)
SMTP server — your remote SMTP web server IP or URl
SMTP port — your server SMTP port. Usually 25 or 587 for Non-Encrypted connections, 465 or 587 for SSL/TLS.
User name — your username (login) on SMTP server.
Password — your password on SMTP server.
Enable SSL — enable SSL technology (encrypted connection, if supported by your server).
Have questions? Contact us: [email protected]
Terms of Service Privacy policy Email hints Contact us
Made with favorite in Cyprus