Email accounts
- Getting app password for AOL mail
- Getting app password for GMail/Gsuite
- Getting app password for Outlook and Hotmail
- Getting app password for Yahoo mail
- Enabling IMAP in AOL Mail
- Enabling IMAP in GMail/Gsuite
- Enabling IMAP in Yahoo Mail
- Enabling less-secure-apps setting in Gmail
- Adding another email address to Gmail
- How to access the Gmail archive
- How to forward Gmail emails to another Gmail
- How to recall an email in Gmail
- How to empty trash in Gmail
- Adding an email folder to Gmail
- Using email filters in Gmail
- Changing your Gmail background
- Marking emails as read in Gmail
- How to cc in Gmail emails
- How to add email to safe sender list Gmail
- 3 ways to attach an email in Gmail
- How to delete all unread emails in Gmail
- How to add an alias to Gmail
- How to add contacts to Gmail
- How to add a signature to Gmail
- How to change Gmail password
- How to blacklist Senders in Gmail
- How to change the name in Gmail
- How to change your Gmail address
- How to create a mailing list in Gmail
- How to delete a Gmail account
- How to encrypt an email in Gmail
- How to forward multiple emails in Gmail
- How to import contacts to Gmail
- Recovering deleted emails in Gmail
- How to select all emails in Gmail
- How to send a calendar invite in Gmail
- How to correctly sign out of Gmail
Email filters - how to automate your email inbox
Use email filters to automate daily routines. Email filters can do magic!
Email filters are a handy tool that allows you to automate the processing of incoming mails according to the set conditions. Using filters, you can automatically delete emails, redirect them to another email box, add labels, and so on.
Setting up email filters in Gmail mailbox
- Click the gear icon in the upper right corner.
-
Click the
Settingsbutton in the list that appears.
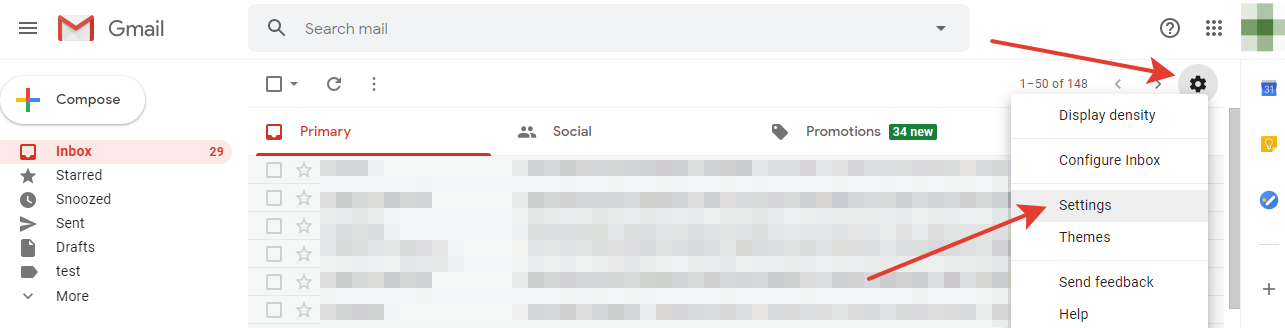
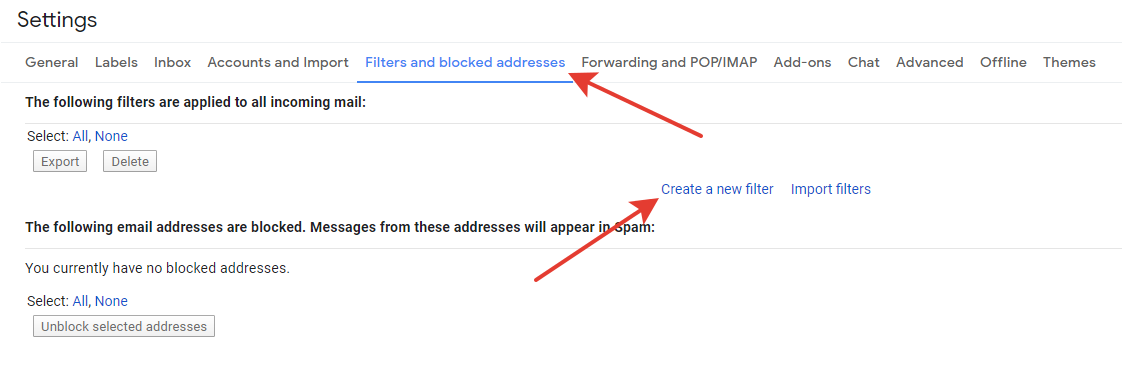
- In the Settings window, select the
Filters and blocked addressestab. - Click the
Create a new filterbutton. - In the new dialog window, check the list of filters you can use:
- Sender's email
- Recipient's email
- Subject
- The words to be found in the email
- Words that are NOT to be found in an email.
- Mail Size etc
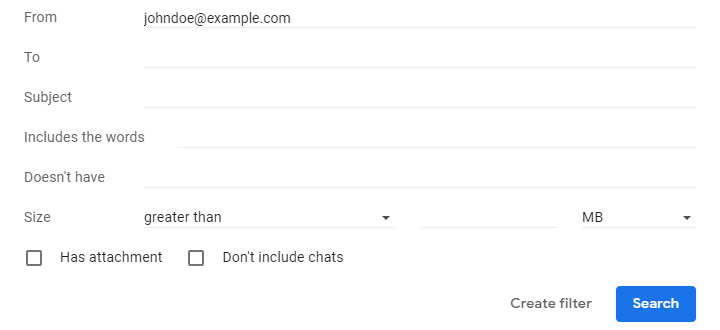
- Press the
Create filterbutton. -
In the next window, doublecheck the selected filters which will be automatically applied to any email
that meets the condition set in the previous step.
Some of the options of mail processing:- Move a message to the trash
- Mark as read
- Add a label
- Forward the message to another email
- Press
Create filter
Done!
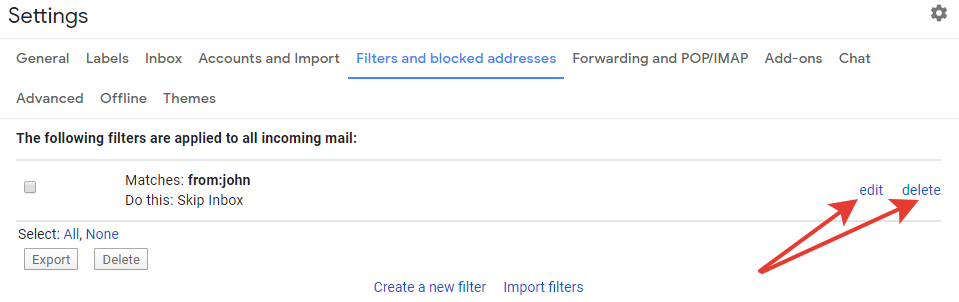
In order to edit or delete a filter, open the filters page (as described in the first topic).
Next to the created filter, you will see the edit and delete buttons.
The 'Edit filter' page is similar to the 'Create filter' page.
Have questions? Contact us: [email protected]
Terms of Service Privacy policy Email hints Contact us
Made with favorite in Cyprus